Adjusting the Contrast of an LCD Module
1. Introduction
Typically, users have the ability to adjust the contrast of an LCD module. This application note describes characteristics and methods with regards to contrast adjustment, as well as design guidelines for proper operation. An example application circuit is shown at the end using a 16×4 character LCD.
1. What is LCD contrast?
The ratio of light to dark areas on an LCD is defined as the contrast ratio. This is one consideration for designers when adjusting the LCD bias voltage. This voltage is represented by: Vee, Ve or Vo. Focus LCDs will reference bias voltage as Vo throughout this document.
Vo is used to power the circuits that drive the LCD. This voltage sets the contrast level of the LCD. Any changes in this voltage will cause a visible change in the contrast, it’s important that it is regulated with less than 100mV ripple.
Contrast is affected by these factors as well:
- TN fluid
- STN fluid
- FSTN fluid
- Normal temperature range
- Wide temperature range
Contrast is not affected by the LED backlight, EL backlight, or of the type of polarizer such as reflective polarizer, transflective polarizer and transmissive polarizer.
2. Techniques for adjusting contrast
2.a Voltage Divider / Potentiometer
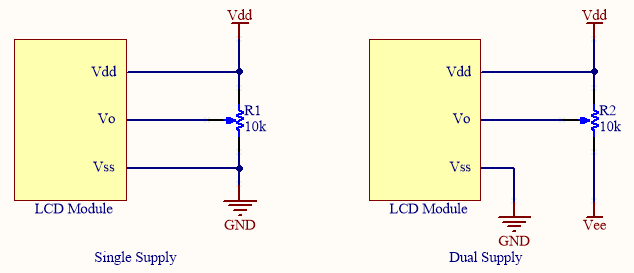
This is the simplest method to use where a voltage divider or potentiometer is connected to Vdd (Figure 1). With varying resistance, one can adjust the bias voltage hence the contrast of the display. Once an appropriate resistance is identified, we will implement that in future displays. Note that for higher voltage displays (>20Vdc), use the dual supply option.

Figure 1: Simple bias supply using potentiometer.
2.b Charge Pump Circuits
Another bias voltage supply method is the charge pump (Figure 2) DC to DC converter that uses capacitors for energetic charge storage to raise or lower voltage. Charge pump circuits are capable of high efficiencies, sometimes as high as 90–95%. The output can be either positive or negative.

Figure 2: Charge pump using TPS60150 (Texas Instruments).
2.c Digitally Adjustable
The circuit in Figure 3 does the same job of varying bias but digitally using a microcontroller through pin 2(ADJ). A CTRL (enable) pin is also provided for turning on or off via the microcontroller. This shutdown signal can also be used to properly sequence the power to the display during power-up and power-down sequences.

Figure 3: Digitally-adjustable bias using MAX749 (Maxim Integrated).
2.d Adjustable Inverter
Figure 4 is an adjustable inverter which generates a variable bias voltage 0 to -12V. This is varied via potentiometer (R1) with a series resistance. The total of which should not exceed 50kW.
The potentiometer can be replaced with a fixed resistance if the end user has no need of adjusting the contrast. This has the advantage of eliminating the need of trimming during production. If the display is being used for portable applications such as mobile phones, a battery is used for the supply voltage (input voltage) as shown in this example circuit.
Note that pin 2 (SHDN) serves as an enable pin to turn on or off the bias voltage. This is important for power sequencing which will be discussed shortly.

Figure 4:Adjustable Voltage Inverter using MAX759 (Maxim Integrated)
3. Timing Considerations
It is critical that the LCD bias is applied at the appropriate time with reference to another signal (power sequence). The power sequence is the sequence in which the power is applied and shut down, and includes specifications of the time intervals between steps in the sequence.
For LCD modules, the simple rule is Vo (Vee or Vi) must never be present without VDD also being present. Otherwise, the display may be damaged even if it is only for a short period.
A simple solution is to use the enable (SHDN) pin of the bias circuit to turn on or off power (Figure 4).
4. Application Circuit
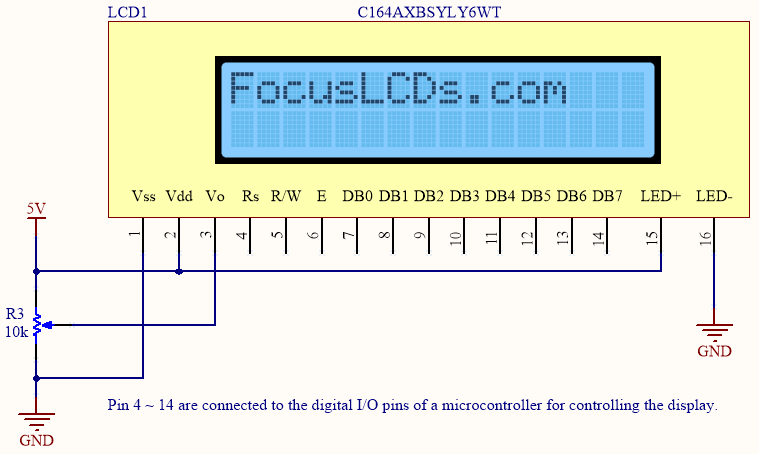
In this example, the C164AXBSYLY6WT character display module is used.
Specifications:
- 16 pins
- 16 columns x 4 rows
- Super-twisted nematic display (STN)
- Yellow background color, LED
- Yellow/green backlight
- Bottom view angle
- Wide temperature
- Transflective (positive)
- ROHS Compliant
This is the simplest and most cost-effective solution, requiring only a potentiometer to vary contrast.

Figure 5: Contrast control for a 16×4 character display.
DISCLAIMER
Buyers and others who are developing systems that incorporate FocusLCDs products (collectively, “Designers”) understand and agree that Designers remain responsible for using their independent analysis, evaluation and judgment in designing their applications and that Designers have full and exclusive responsibility to assure the safety of Designers’ applications and compliance of their applications (and of all FocusLCDs products used in or for Designers’ applications) with all applicable regulations, laws and other applicable requirements.
Designer represents that, with respect to their applications, Designer has all the necessary expertise to create and implement safeguards that:
(1) anticipate dangerous consequences of failures
(2) monitor failures and their consequences, and
(3) lessen the likelihood of failures that might cause harm and take appropriate actions.
Designer agrees that prior to using or distributing any applications that include FocusLCDs products, Designer will thoroughly test such applications and the functionality of such FocusLCDs products as used in such applications.