RGB Interface with Arduino Due
This application note will discuss how to connect a 5.0” portrait mode display through the RGB interface with an Arduino Due.
1. Introduction
The purpose of this application note is to review the RGB interface and discuss any requirements necessary for communicating with the microcontroller through this interface. The display communicates with the microcontroller over 45 pins through an RGB interface. An additional graphics controller is required to use this interface. The graphics controller chosen for this application is the SSD1963 LCD Controller Graphics card.

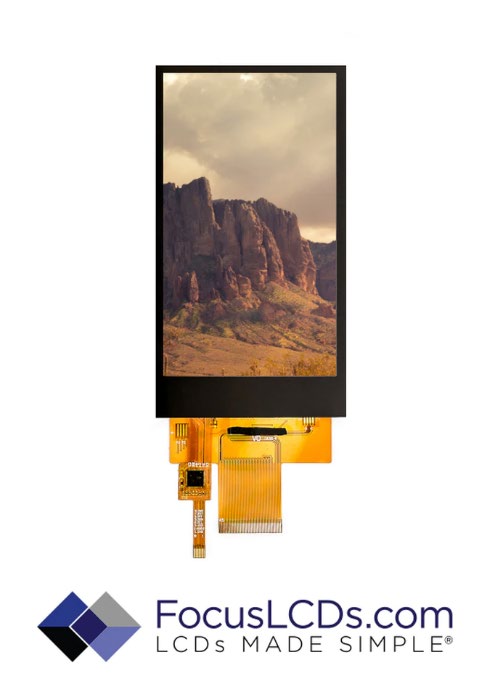
The display featured in this application note is a transmissive, 5.0” (67.56mmx122.35mm), portrait mode TFT display. The part number for this display is E50RG84885LWAM520-CA. This display has a built in controller IC ILI9806E. This display also has a capacitive touch feature. Features of this display are listed below.
TFT Features
| Low Input Voltage: 3.3V | Backlight Voltage: 19.2V, 40mA |
| Display Colors: 65k/262k/16.7M colors | Viewing Angle: All View |
| Interface: 3 wire SPI + 24-bit parallel RGB | TFT Controller IC: ILI9806E |
| CTP Interface: I2C | CTP Controller IC: G911 |
| Display Mode: Transmissive/Normally Black | CTP Touch Mode: 5-Point |
Mechanical Information
| Item | Min | Typ. | Max | Unit | Note | |
|---|---|---|---|---|---|---|
| Module Size | Height (H) | 67.56 | mm | – | ||
| Vertical (V) | 122.35 | mm | – | |||
| Depth (D) | 4.03 | mm | – | |||
2. Requirements
This section will discuss the materials that are used in this application. Below is a list of the components used and their specified function.
| Item | Description | Note |
|---|---|---|
| 5.0” TFT Display | Part No: E50RG84885LWAM520-CA | FocusLCDs.com |
| Arduino Duo | Arduino Due microcontroller, 32-bit ARM core processor, 54 pins. | Arduino |
| SSD1963 Controller | SSD1963 LCD Graphics Controller, 1215kB embedded SRAM for display frame buffer. | Solomon |
| FPC Connector | 45-pin FPC connector. Converts 45-pin ribbon display connector to output pins. | |
| DC Power Supply | Voltage generator to provide 19.2V, 40mA to display backlight. | |
| Micro USB | Micro USB Connectors for Arduino serial programming interface. |
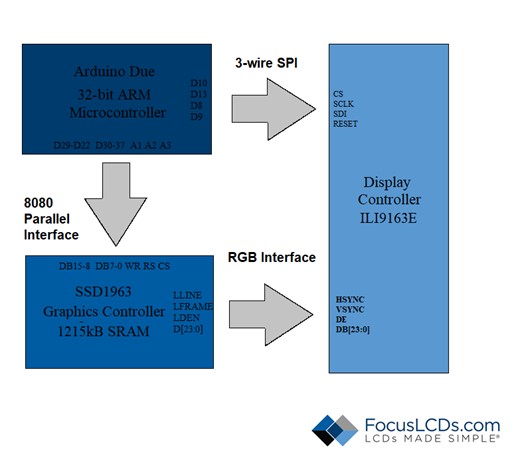
The display used in this application has an internal built-in display controller IC ILI9806E. This controller IC does not contain internal RAM and therefore an additional graphics controller SSD1963 is required to provide the RAM that supports the RGB interface. The ILI9806E controller IC that is built into the display provides the 3-wire serial interface to input the initialization commands for the RGB interface.

Once the initialization commands are sent via the 3-wire serial interface, the graphic controller will be used to send the RGB commands to the display. The SSD1963 graphics controller chip is used to communicate to the RGB interface on the display. The graphics controller provides the SRAM required to drive the display. This controller provides a 1215kB frame buffer to support the 24-bit graphics data to the display.
The graphics controller would not be required if the internal IC embedded in the display contains internal RAM. The specification sheet for the embedded display controller IC should be used to verify this information. The graphics controller chip is accessed after the SPI initialization of the display. The graphics controller chip communicates with the microcontroller through a 16-bit parallel 8080 MCU interface.
The microcontroller in this application is a 32-bit ARM core processor. This device communicates with the display over the serial interface to send the SPI initialization commands. Once completed, the microcontroller will then communicate to the graphics controller through an 8-bit parallel initialization command and then 16-bit graphical data commands and functions.
3. Hardware Connections
A review of the connection ports and pins between each device will be specified in this section. Starting with the display and the connections with the graphics controller as well as the microcontroller. The display’s 3 wire serial pins can be directly connected to the microcontroller. The RGB interface pins will be connected to the graphics controller. Below is a description of the pin connections on the display.
5.0″ TFT Pin Assignment

The next hardware connection that will be reviewed is between the graphics controller chip and the microcontroller. The two devices are connected through a 16-bit 8080 parallel interface. The graphics controller will receive initialization commands from the microcontroller specifying its own requirements as well as commands that will be sent to the display over the RGB interface. The parallel connection between the microcontroller and the graphics controller are as follows.
Graphics Controller (SSD1963) Pin Assignment

The microcontroller provides the logic voltage and logic ground for both the display and the graphics controller. There are two reset pins total, one connected to the display and one for the graphics controller. It is important to only use the reset pin for the SPI initialization and set the graphics controller reset to 3.3V. If the graphics controller reset pin is toggled, the SPI initialization commands stored on the display will be reset as well.
The Arduino Due is connected to both the display and the graphics controller. First the microcontroller sends the SPI initialization commands to the display’s embedded controller IC. Next it will communicate with the graphics controller over an 8-bit 8080 parallel interface to initialize the 16-bit parallel interface parameters. Once both devices are initialized, further commands can be sent through the graphics controller to the display to create an image.
4. Commands
The initialization commands required for the display and graphics controller to start will be reviewed in this section. The microcontroller will need to send two sets of initialization code over each interface. The pins will need to be calibrated to each of their specified interfaces, SPI and 8080 Parallel interfaces. The first set of initialization commands are sent to the display’s SPI pins. This code will define the RGB interface parameters required to use this interface.
The initialization code that is sent to the displays SPI pins can be found here.
This code defines the RGB interface timing characteristics, the resolution of the display, the voltage settings and much more. The initialization commands and data specific to the display can be found in the data sheet of the embedded IC controller ILI9806E. Review the specification sheet for this controller for details on the commands and functions of this code.
To send the data and commands over the SPI interface, four peripheral pins will need to be declared depending on the microcontroller used. Once the data pins are setup the SPI interface can send the initialization code in the following sequence. This code is represented in the following timing diagram as a typical 3-wire SPI interface.

3-Wire Serial Interface Timing Diagram
The initialization code for the graphics controller is sent over a parallel 8080 interface. The sequence of commands is to first initialize the graphics controller and specify the display parameters, followed by the code that will be sent over the 16 data buses. The initialization commands for the graphics controller SSD1963 are detailed in the controller’s specification sheet. The code used to initialize the graphics controller can be found here.
The initialization code for the graphics controller defines the parameters of the display and the required timing characteristics. The specifications and timing definitions can be found in the spec sheet of the display. The commands that are sent in this section lets the graphics controller know the details specific to the display that we are using in this example. The data is sent over the 8080-parallel interface to the graphics controller. Below is the timing diagram of this parallel interface.

Parallel 8080-Series Interface Timing Diagram
5. Conclusion
After the initialization commands for both the display and the graphics controller are sent, the display is now ready for communication. The graphical data or images will be sent to the graphics controller’s RAM to be accessed by the display via the RGB interface. Communication to the display is fast and efficient for transmitting images that are to be displayed. For this example, an application was written to display bitmaps on the screen. Below is the output of this example.

DISCLAIMER
Buyers and others who are developing systems that incorporate FocusLCDs products (collectively, “Designers”) understand and agree that Designers remain responsible for using their independent analysis, evaluation and judgment in designing their applications and that Designers have full and exclusive responsibility to assure the safety of Designers’ applications and compliance of their applications (and of all FocusLCDs products used in or for Designers’ applications) with all applicable regulations, laws and other applicable requirements.
Designer represents that, with respect to their applications, Designer has all the necessary expertise to create and implement safeguards that:
(1) anticipate dangerous consequences of failures
(2) monitor failures and their consequences, and
(3) lessen the likelihood of failures that might cause harm and take appropriate actions.
Designer agrees that prior to using or distributing any applications that include FocusLCDs products, Designer will thoroughly test such applications and the functionality of such FocusLCDs products as used in such applications.